The Ultimate Guide to Dual-Booting Windows and Linux on the Same Drive!
Created by: DDashUnknown

Welcome to DDashUnknown's Ultimate Dual-Boot Guide! This documentation will guide you in revitalizing your computing experience across almost any computer you already have! It is designed such that you can follow from start to finish OR focus on specific sections that are relevant to you if you simply want to either:
- Switch to Linux entirely as your only operating system.
- Use the best, most thoroughly debloated version of Windows available with no possibility of updates that will break your system in any way.
NOTE: This documentation is designed to be supplemental to the video walkthrough I created, so it's recommended to keep both handy side-by-side!
Table of Contents
- 0 ~ Preamble
- 1 ~ The Pre-Setup Process
- 2 ~ Backing Up Your Files
- 3 ~ The Initial Windows Setup
- 4 ~ The Main Windows Setup
- 5 ~ Carefully Restoring Files
- 6 ~ Preparing To Install Linux
- 7 ~ Installing Linux
- 8 ~ A Time Change Issue & Easy Fix
- 9 ~ Completely Removing Linux
- 10 ~ COMPLETION!
0 ~ Preamble
0.1 ~ Why I'm Making This & Why Should You Care?
Many are very familiar with Microsoft's abhorrent business practices & their enshittification of Windows 11. After they discontinued Windows 10 support, it was all downhill from there, with so many updates which continuously break the most basic functionality. However, even before this, some issues with Windows 10 made the experience sluggish, from bloatware to very unoptimized settings which are possible but difficult to change if you don't know where to look.
As a solution, many often say to "Just switch to Linux", and while this advice is sound on the surface, the reality is that many cannot fully abandon the Windows ecosystem, and/or perhaps feel too intimidated by Linux, whether it is due to one or more of the following:
- Hostile Linux evangelists
- The installation process (i.e. fear of messing up their computer)
- A single bad Linux experience
- Unsupported applications you need for your workflow
I made this guide to make the installation process clear & complete from start-to-finish, along with general documentation of how computers and operating systems work in the real world! In this way, more users will be confident to install & perhaps even daily-drive Linux with Windows becoming secondary!
0.2 ~ Who is This Guide for?
This guide is for those who:
- Want to switch to Linux AND
- Cannot or do not want to abandon Windows entirely AND
- Want to safely dual-boot Linux on the same storage drive.
That last point is especially important and is quite contentious in the Linux community, as many insist that dual-booting off of the same drive is a terrible idea, and for good reason. Windows 11 updates are very hostile to Linux installations on the same drive and can overwrite them, causing you to lose all its data! That said, we need to find a way to do this safely, as not everyone has the luxury of purchasing a separate drive & installing it on their desktop PC or laptop.
The solution here? We can safely dual-boot with a DIFFERENT Windows, one that is guaranteed to not have breaking updates with no new "features" ever added, yet also receive critical security updates until the end of 2031, ALL FOR FREE, NO STRINGS ATTACHED! The only "catch" is defined below.
THE CATCH...
This process requires patience, a willingness to learn and a concentrated short-term time commitment. The benefits are long-term, as you'll likely never have to worry about bloat encroaching on your system for many years to come, especially if you want to need to repeat the process multiple times!
If, after reading all of the above, you're interested in following this dual-boot guide, we are all go to get started! 👍
1 ~ The Pre-Setup Process
1.1 ~ Gathering Physical Equipment
Below is a list of the absolute necessities and recommended equipment you should have handy for this walkthrough.
You will absolutely need:
- A USB Flash Drive (A minimum of 1, but more is better)
- 16 GB is the recommended minimum. I have done this successfully with 8 GB, but go with 16 GB for larger ISOs
- The more you have, the more operating systems you can flash, ready-to-install (Ex., 3 drives for Windows 10, Linux Mint, Nobara, etc.), the more time you save! Otherwise, you'll need to flash operating systems to the same drive
- A Windows PC (A minimum of 1, but at least 2 is better for backup and quicker recovery
purposes)
- You will be re-installing Windows on your main PC and would be taking a bigger risk if you don't have a secondary computer on hand
- 2 PCs save you time and ensure you can bring over critical files you may have missed on a USB drive (Ex., Wi-Fi drivers)
- An External Drive
- Important for backing up your files
- The more storage, the better!
1.2 ~ Downloading the Windows Software & Files You'll Need
Windows 10 IoT Enterprise LTSC
Acronym Breakdown
- IoT = Internet of Things
- Enterprise = Designed For Businesses (Perfectly capable for home use though!)
- LTSC = Long Term Servicing Channel
This version of Windows is the lifeblood of the guide. It's a fully debloated version of Windows 10 which will only receive security updates and no "feature" updates until the end of 2031!
It's meant for devices like kiosks which are meant to "just work" in a very boring, static, predictable manner without any substantial changes, ever! No updates will break anything because there are no features ever added in this version and it is perfectly capable of running on most computers! Perfectly static, perfectly sound & serene. 😌
By continuing with this part of the guide, you accept the risks of downloading an ISO from a third-party source! It is your responsibility to ensure the checksum of the file matches the ones below! If you are unsure how, follow this quick terminal-based guide using PowerShell.
- MD5:
2463b19beac328290e6a8adcedb7533a - SHA1:
76c3c10e38307d29fd8b4748522ed144dba35829 - SHA256:
a0334f31ea7a3e6932b9ad7206608248f0bd40698bfb8fc65f14fc5e4976c160 - SHA512:
640942d93daf8cd183d06e35d5d753a4b93c952c3196c3e3fa7876295b39d8bfef5df8ef2a3b420b5247905fe396606f94ccf093982ee999e503d09e69850143
Downloadable Links
TIP! 💡
One link may be faster to download from than the other. Try both out & see which is faster!
Rufus
As defined by the Rufus website:
"Rufus is a utility that helps format and create bootable USB flash drives, such as USB keys/pendrives, memory sticks, etc."
This is the software you'll be using to flash ISO files to your USB drive(s). For our purposes, "flashing" is essentially the process of formatting a USB drive in such a way that it is recognized by computers as an operating system to install.
NOTE: You can use this software for both Windows and Linux ISOs, but you can also use Balena Etcher to flash Linux ISOs with a much simpler interface, which is also cross-platform! Keep this app in mind for later in the tutorial and use Rufus for now.
FreeFileSync
As defined by the FreeFileSync website:
"FreeFileSync is a folder comparison and synchronization software that creates and manages backup copies of all your important files. Instead of copying every file every time, FreeFileSync determines the differences between a source and a target folder and transfers only the minimum amount of data needed. FreeFileSync is Open Source software, available for Windows, macOS, and Linux."
This is an incredible free software for optimally backing up your files such that you can actually see what's happening and retain complete control over what you back up!
Wi-Fi Drivers For Windows (Recommended To Be Safe)
You may get lucky & have your Wi-Fi drivers automatically pre-recognized by your fresh Windows 10 IoT Enterprise LTSC install, but this is not a guarantee! To be safe, grab the Wi-Fi driver installation files for your specific computer.
Since this process will be different for everyone, the best universal advice I can give is the following:
- For laptops and pre-built PCs for which you can locate a model number, go to the manufacturer's website and
enter that number to find its corresponding Wi-Fi drivers.
- Ex. I have an
Acer Nitro 5laptop, so I would searchAcer Nitro 5 Wi-Fi Driver, then enter the serial number if needed.
- Ex. I have an
- For custom-built Desktop PCs, follow this short how-to article to check what motherboard you have, then search for its corresponding drivers to find the Wi-Fi driver you need.
2 ~ Backing Up Your Files
While this won't be an in-depth walkthrough on file backups, I will briefly discuss my version of a best practice when it comes to backing up my files to an external drive using FreeFileSync.
I usually back up my entire user folder, but you can back up additional folders if you have critical files or system configurations you want to remember elsewhere.
Once you see the interface, your file path in the left column should be C:\Users\{Username}. I
recommend the folder you back up to have the same exact username for easy reference, so it could look like the
following:
D:\Backups\Windows Backups\Main PC\{Username}
Paste or navigate to the following path and apply the right column. FreeFileSync does transfers from left-to-right, as shown in the interface below.
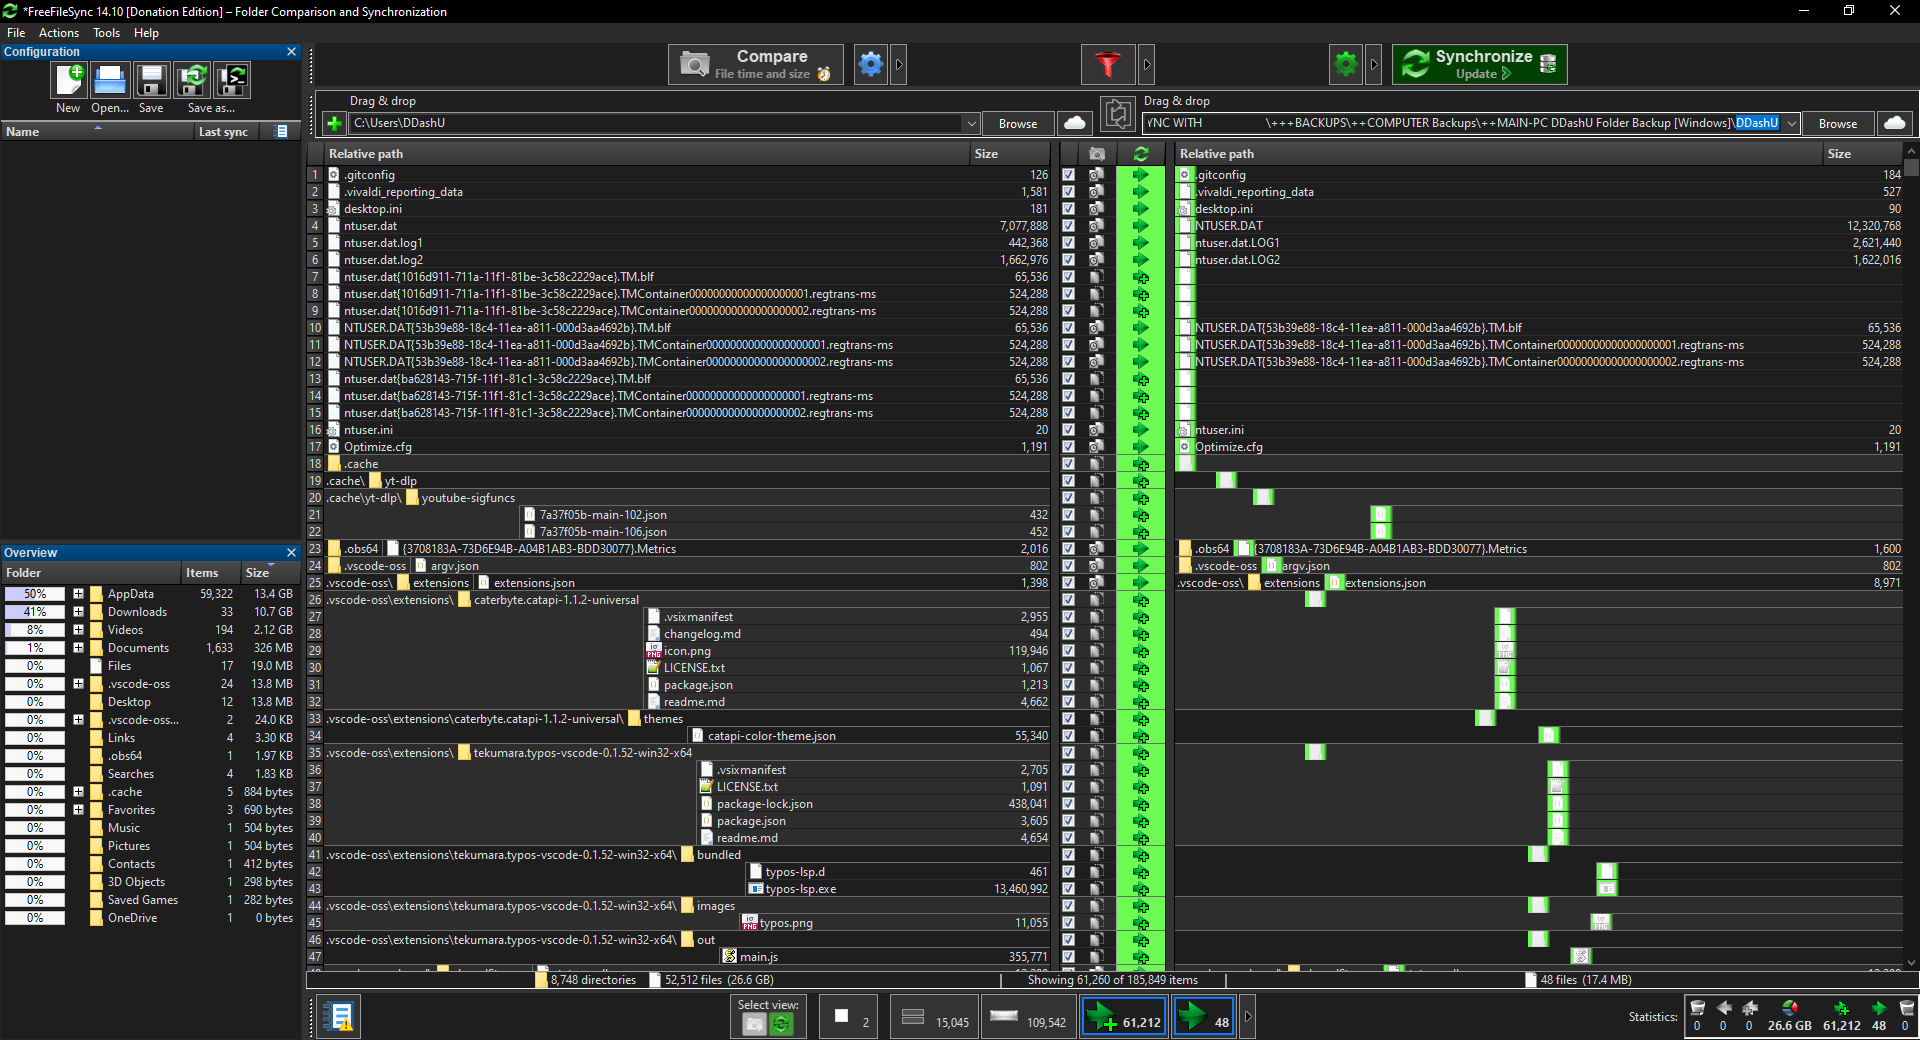
FreeFileSync provides you with three options:
- Synchronize (Two-way backup where all files in both locations will be copied to one another)
- Mirror (All files on the left will be copied to the right such that it's an exact copy. This will delete any non-matching files on the right!)
- Update (Updates all files on the right with the left, assuming the left is newer. This keeps all other files which are not updated as-is)
For a first-time copy to a blank folder, it doesn't matter which option you choose. Typically, I mirror when I know that the folder on the right is outdated when it comes to backups, or update when I'm not sure.
You also get access to a filter option where you can exclude certain folders and files within the user folder. This is beneficial for saving you time! My specific filters are defined below. Simply follow the conventions below & remember that * is a wildcard character.
Copy and modify the following filters as you'd like (you may have to do them one at a time, which is my only current gripe with an otherwise amazing app):
Forward Slash Variant:
/System Volume Information/

/$Recycle.Bin/

/RECYCLE?/

/Recovery/

*/thumbs.db

*/.Trash-*/

*/.recycle/

*/*cache*/

*/.cache/

*/temp/

*/node_modules/

*/.local/

*/.var/

*/*modules*/
Backslash Variant:
\System Volume Information\

\$Recycle.Bin\

\RECYCLE?\

\Recovery\

*\thumbs.db

*\.Trash-*\

*\.recycle\

*\*cache*\

*\.cache\

*\temp\

*\node_modules\

*\.local\

*\.var\

*\*modules*\
NOTE: If you put the
AppDatafolder in this exclusion list, you may not be backing up important folders you want saved, such as Minecraft Bedrock worlds! I learned this the hard way...
Adjust the list above as you see fit.
3 ~ The Initial Windows Setup
Once you've completed your backup, you're ready to start installing Windows 10 IoT Enterprise LTSC! Get your ISO ready & follow the steps below.
3.1 ~ Flashing A USB Drive
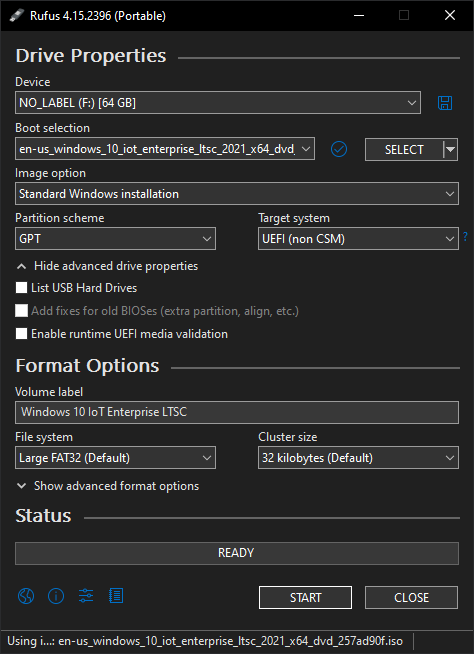
Open Rufus and ensure it's up-to-date, then follow these instructions:
- Under
Boot Selection, select the Windows 10 IoT Enterprise LTSC ISO from wherever you saved it. This should populate most of the other fields you need already. - Under
Device, select the USB drive you want to format to. This will delete all data off the selected drive, so copy/move files off this drive if it's not empty! - View
Partition Scheme. You'll see two options: MBR and GPT. All you need to know is that MBR is for older hardware & GPT is for newer hardware. What that means can be quite ambiguous, so my rule is as follows: Unless your hardware is SUPER old & if in doubt go with GPT!
Aside: I installed Windows on my 2015 MacBook with GPT without issue, so most computers post-2015 should work with GPT just fine.
If GPT fails, switch to MBR and see if that works.
- Rename the
Volume Labelas you'd like. - Leave all other settings as-is and click the
STARTbutton. There will be additional Windows-exclusive options for you. I recommend checking all of them and changing the username if you'd like. This will save time later.
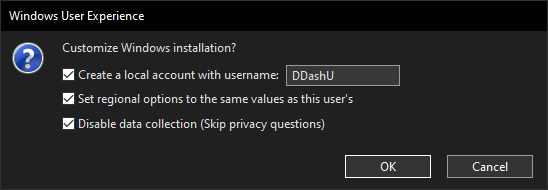
Finally, click OK, read through all the warnings and accept them, as they exist to really
emphasize that the drive will be wiped clean entirely! Once flashing is complete, leave it
plugged in and advance to the next section!
3.2 ~ Booting Into the USB via BIOS/UEFI
- BIOS = Basic Input-Output System
- UEFI = Unified Extensible Firmware Interface
The most vital and most difficult step in the entire process is upon us! This is a step where most people who wish to install Linux tend to turn away.
Remember: Being scared is natural, and we're gonna get through it anyway!
TIP! 💡
While BIOS is a more familiar term in the tech vocabulary, both acronyms essentially refer to the same system for our purposes,
Let's get into it!
3.2.1 ~ Booting Into BIOS/UEFI Settings
There are various ways to boot into the BIOS/UEFI settings. Any one of the following will work, so choose the one you like the most:
- The Button-Mash Method: Restart normally, then repeatedly press one of the
pre-determined buttons as your computer turns on. View this handy
table to figure out which
BIOS/UEFI SETUP Keyto use (the third column).
There is a Boot Menu Key option which you can use instead (the second column), but this tutorial
will focus on the setup key for now.
- The Shift-Restart Method: Hold down
SHIFTas you restart. You will be presented with a list of options. Select the following in this order:
Troubleshoot -> Advanced Options -> UEFI Firmware Settings -> Restart
- The Command-Line Method: The quickest for users who are comfortable using the terminal (a very nice-to-have in general for this tutorial!).
- a. Right-click on the start menu
- b. Click
Windows Powershell (Admin)and clickYeson the security prompt. - c. Copy/Paste the following command into the terminal.
shutdown /r /t 0 /fw
You can right-click and paste into the terminal, and press ENTER if it doesn't execute right away.
3.2.2 ~ The BIOS/UEFI Interface & Instructions
If you executed any one of the three methods correctly, you should be brought into the BIOS/UEFI interface.
From here, the steps you need to take vary by the motherboard, so you'll need to do some research yourself if you get stuck. That said, I will show two of the most common interface types, one of which will most likely apply below.
Before that though, here is the difference between Boot Priority and Boot Menu, both of
which are valid methods for this tutorial
- Boot Priority: Change the consistent boot behaviour of your system. If/when you install Linux, it will be inserted at the top, and you can change this order later. Ideal for selecting which OS you want to boot into longer-term.
- Boot Menu: Change which option to boot into once. Ideal for one-time booting!
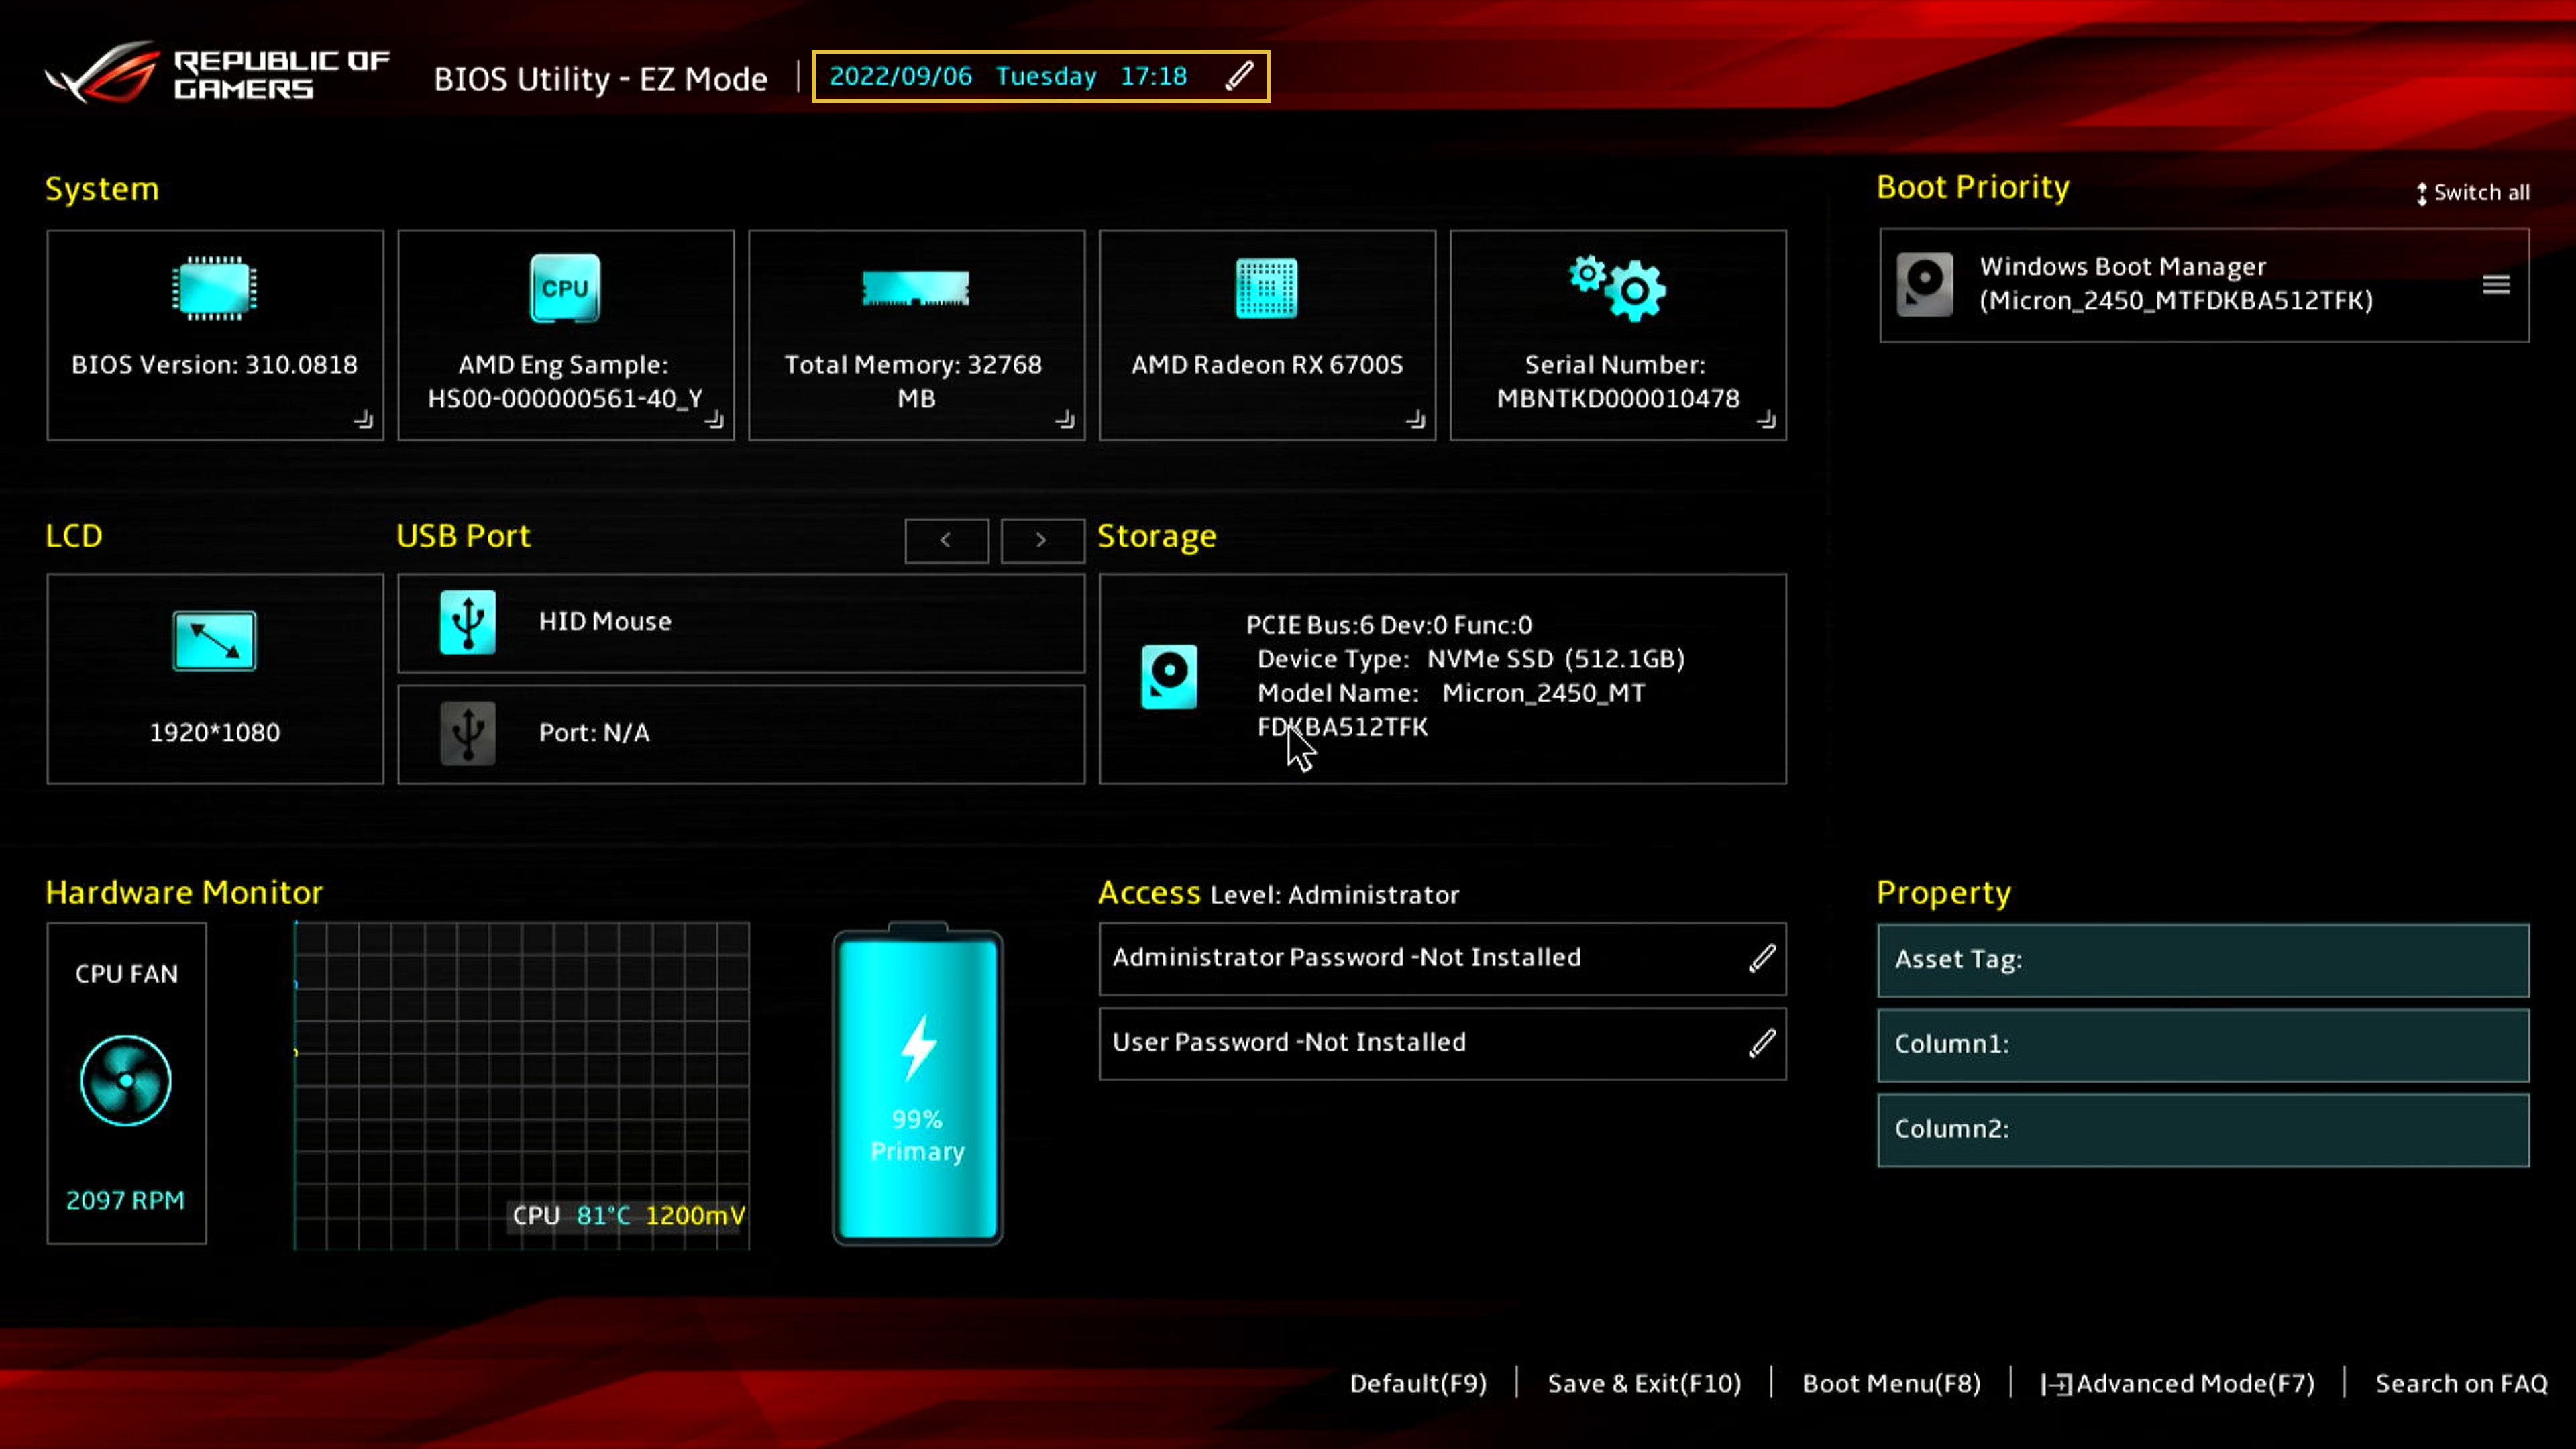
In both cases, navigate to the Boot Menu if available, or switch the boot priority such that you boot into your USB drive.
Interface 1: Mouse-And-Keyboard
Interface 2: Keyboard-Only
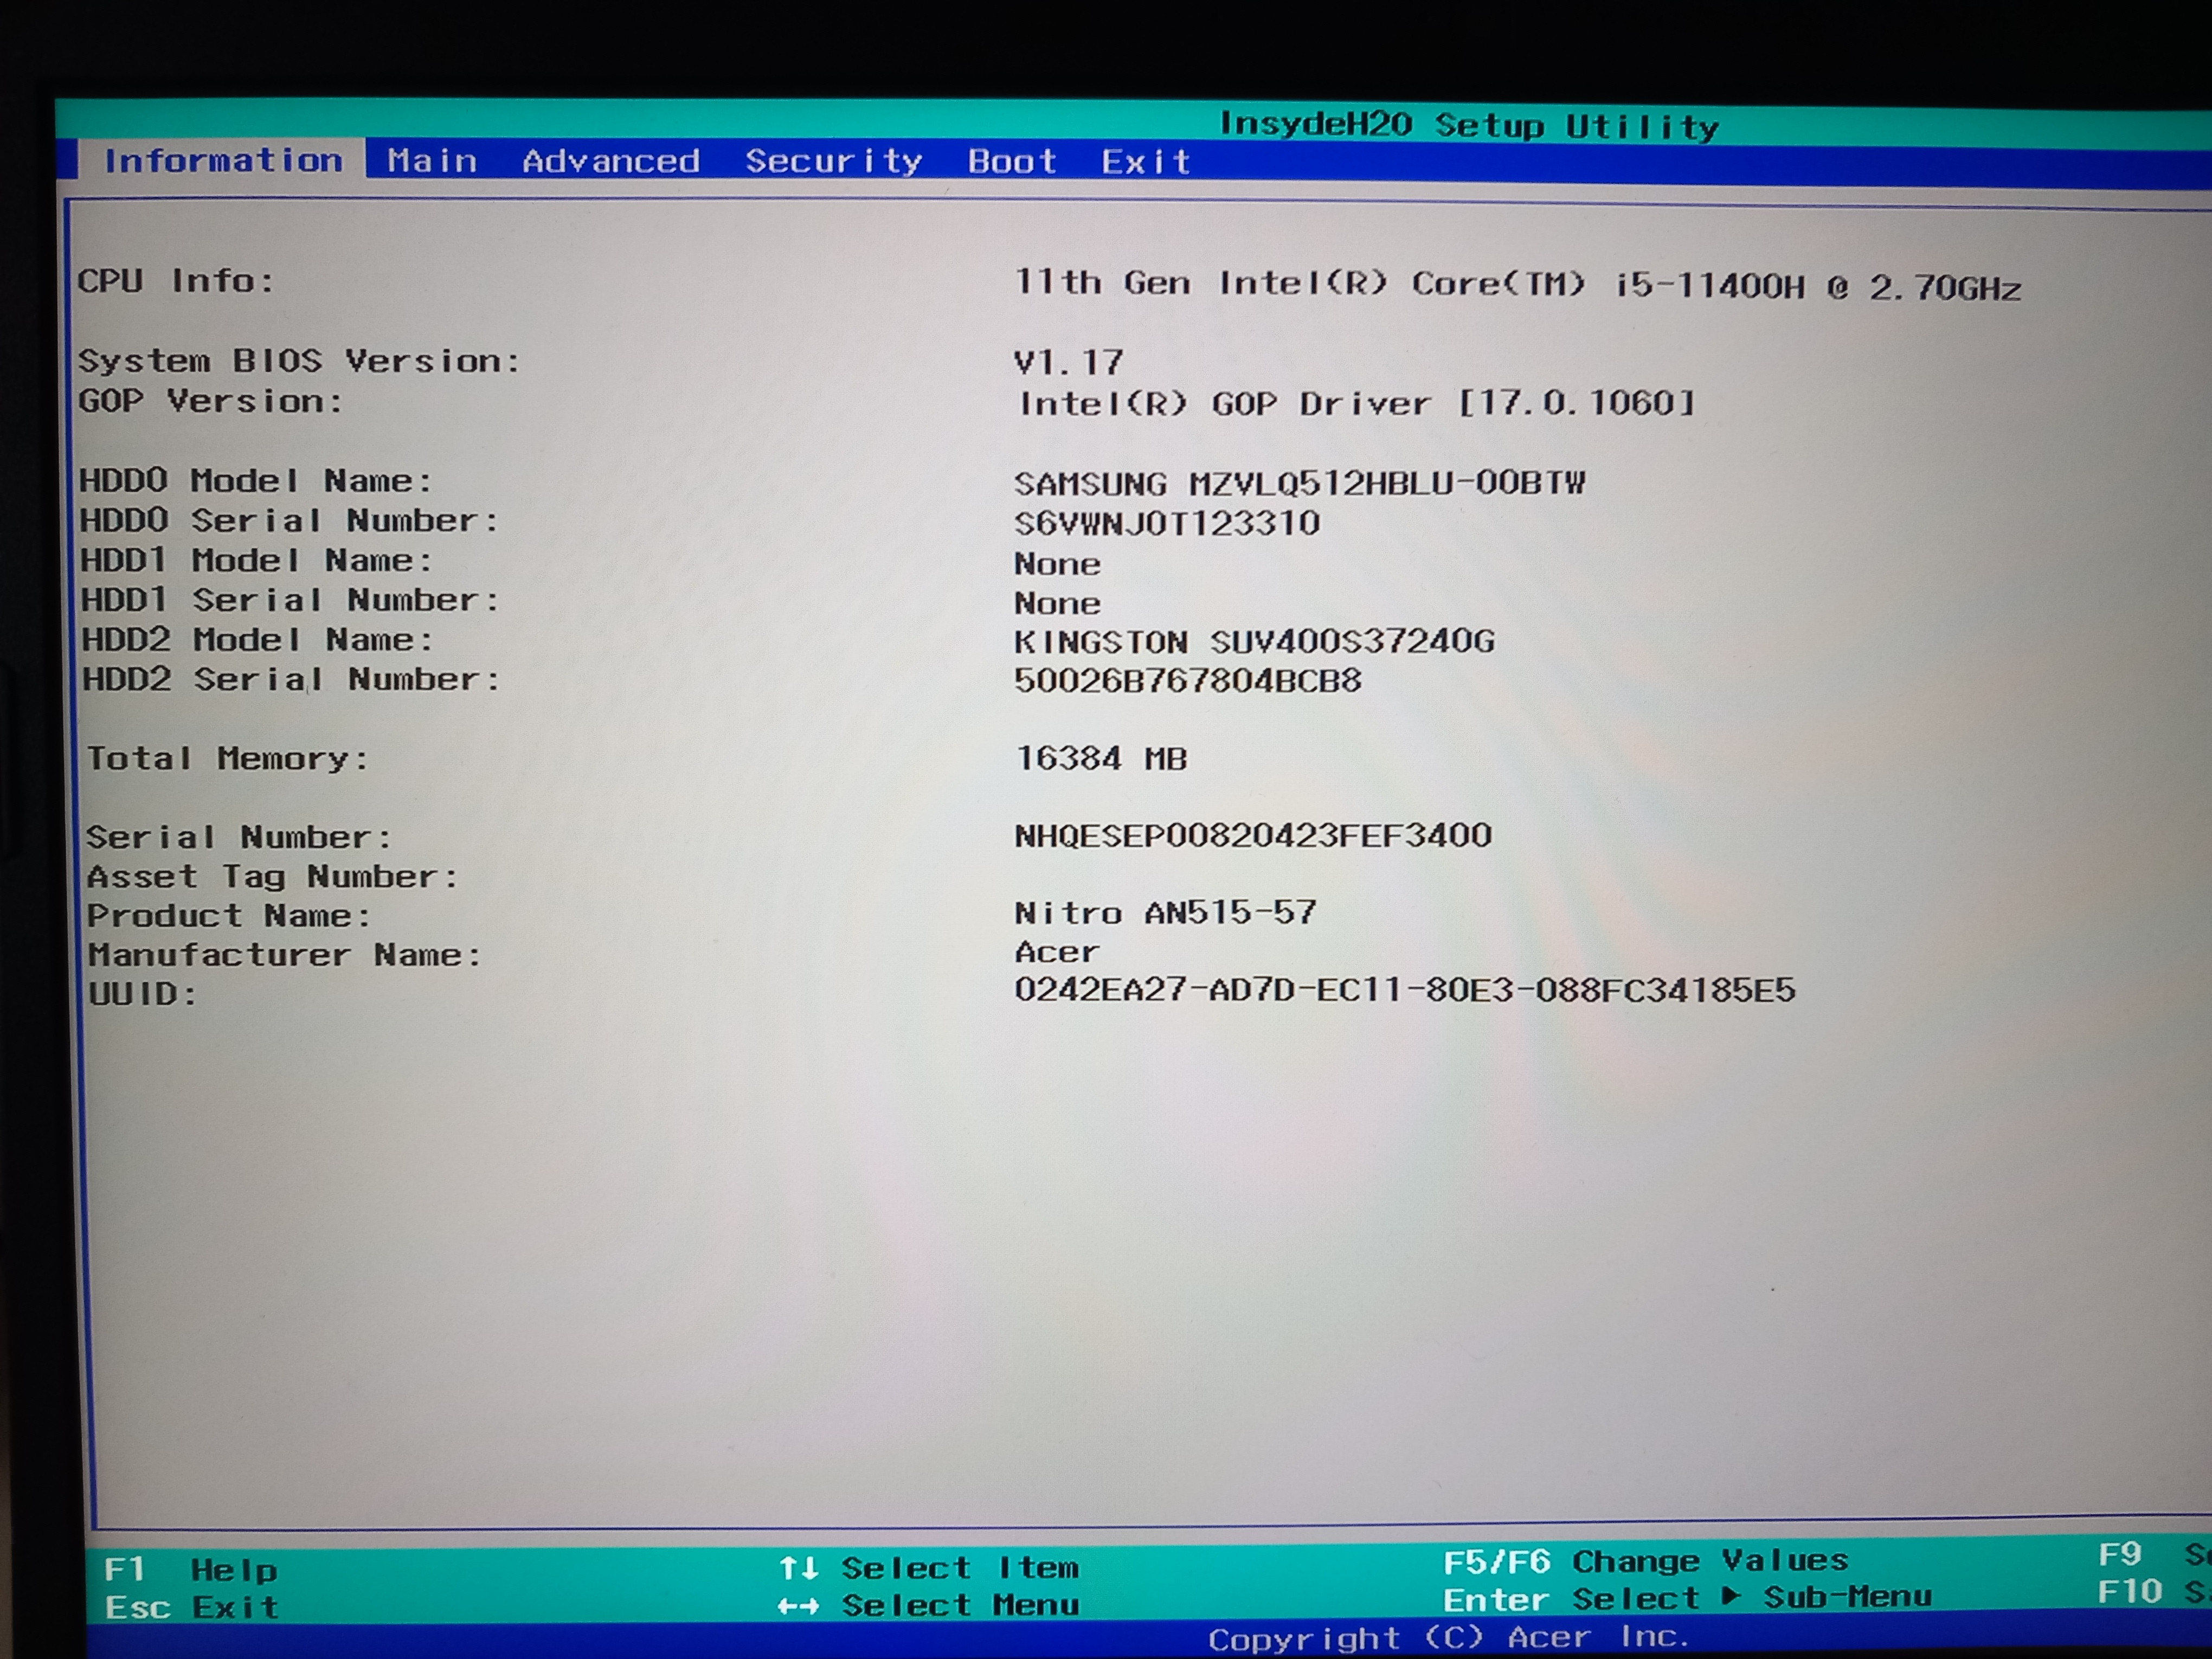
Regardless of your interface type, you should be able to do the following:
- Disable Secure Boot (Important to prevent issues booting into various Linux distros. You can re-enable this at the end if you wish.)
- Navigate to either the boot menu or switch boot priority as mentioned above.
- Save Changes & Exit (This can be done via navigating the menus or most likely pressing
F10)
3.2.3 ~ The Windows Installer
Once you boot into the USB drive, proceed to install Windows via the Advanced setup, and select the
partition containing your already existing Windows install. There's no need to delete or format anything!
Instead, Windows should prompt you saying that it will move all your existing files into a
Windows.old folder right at your `C:` drive, meaning you don't actually need to restore from your
backup. Still, it's always wise to do so, which is why I listed it as a requirement previously.
From here, follow the on-screen instructions, ensuring you select the following options as they appear:
I don't have a product key(Activation will come later)I don't have internet(Best prevents forced Microsoft account logins)Continue with limited setup(Same as above, brings you to the desktop quicker)
Once you're at the desktop, see if you can connect to Wi-Fi. If you can, excellent! If not, you'll need to copy over those Wi-Fi driver files from a different USB drive or reformat your existing USB drive!
To reformat a USB drive back into a standard file system, right-click in the Explorer menu and select
Format, then select either exFAT (cross-compatible with MacOS & Linux) or
NTFS (optimized for Windows but is improving on Linux) and leave the rest as their defaults. Either
is good for this purpose.
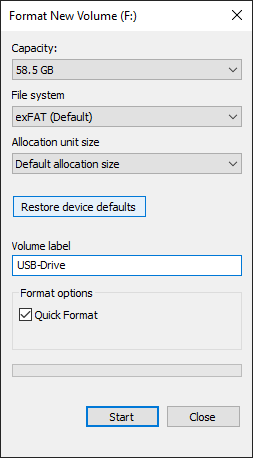
TROUBLESHOOTING TIP! 💡
If the storage shown in the window above is significantly less than what is specified on the USB drive, right-click the start menu and select
Disk Management. Locate your USB drive, and right-click each partition and delete the volumes until you have one completely black bar. Then, create aNew Simple Volumeto your liking.
If done successfully, your USB drive should appear as one completely blue bar:
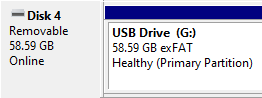
Once Wi-Fi is finally connected, proceed to the next section!
4 ~ The Main Windows Setup
Now that your Windows desktop is up & running, you're ready to start getting your system up-to-date and ready-to-use! You'll notice how minimal it is. Barely anything on the desktop, nothing in the taskbar, nothing but essentials in the start menu. It's a beautiful, de-bloated sight! 😍
Now, we're ready to really start bringing our new Windows system to life!
4.1 ~ Trigger Updates & Pin/Unpin Your Programs
First & most important, trigger updates, as these will take the longest. We can continue with future steps in the meantime.
Let's configure our system to look how we want it now! Before anything, pin/unpin the essential apps you want to
the taskbar or start menu. What I do is pin File Explorer and unpin Edge from the start
menu.
4.2 ~ Installing Important Apps
Next, we'll install important Microsoft apps that most folks use in their productivity workflows: the Microsoft Office Suite. I will NOT be referring to it as "CoPilot 365" or whatever, as that's antithetical to what we're doing in this guide!
4.2.1 ~ Installing Apps Through Chocolatey (Optional)
Chocolatey is a third-party package manager for Windows which makes installing most apps an absolute breeze! It requires using the terminal and technical know-how, but keeping the commands handy will save you TONS of time long-term. Here's how to do it!
- Right-click the start menu and open
Powershellas Administrator. - Right-click the top-left corner of the window, select
Defaults, and disable bothQuickEdit+Insertmodes. These settings cause PowerShell to freeze when you click a different window. More specifically, the operation executing in the window halts until you click back into it, wasting a ton of time (this should not be the default). Close & re-open PowerShell as Administrator one more time for good measure! - Run the following commands to install Chocolatey, sourced from the official website and optimized by yours truly:
Get-ExecutionPolicy
Set-ExecutionPolicy RemoteSigned
Set-ExecutionPolicy Bypass -Scope Process
Set-ExecutionPolicy Bypass -Scope Process -Force; [System.Net.ServicePointManager]::SecurityProtocol = [System.Net.ServicePointManager]::SecurityProtocol -bor 3072; Invoke-Expression ((New-Object System.Net.WebClient).DownloadString('https://community.chocolatey.org/install.ps1'))
choco feature enable -n=allowGlobalConfirmation
choco
You can simply copy/paste them into PowerShell as an admin, and they should all execute. If not, hit
ENTER to batch-run these commands.
- Install these essential programs via
choco installif you wish.
choco install etcher rufus {Web Browser} office365proplus
Here's what each name actually installs:
etcher: Balena Etcher is an ISO USB flash tool much like Rufus; it's a convenient way to access it from your system in the start menu!rufus: Allows Rufus to be accessible system-wide.{Web Browser}: Replace this with any web browser that you wish. This way, you don't even open up Edge to download & install a different browser! Tryfirefoxorlibrewolfif you're unsure what to put here! It's by no means mandatory though.office365proplus: The most hassle-free way to install the entire Microsoft Office Suite in a single command. No prompts, no confirmation, no inputs of any kind needed!- NOTE: It takes a lot longer to install, but you'll only need to do this one time, so please be patient!
Now, you can install a variety of apps through Chocolatey's vast package library, containing many apps you likely use daily.
In my years-long experience of using it, very few of the apps I've downloaded are inferior to installing them as
standalone programs. I recommend using Chocolatey to install apps using the command above & upgrade most of
your apps using a single command: choco upgrade all. This is your call to make, ultimately.
TO UNINSTALL SPECIFIC APPS...
If at any point you experience issues installing software with Chocolatey, or you wish to not have certain apps associated with a package manager, simply run
choco uninstall {name}where{name}is the package name of as many apps as you wish, very similar to what is shown above.
4.2.2 ~ Installing QTTabBar (Optional)
QTTabBar is a third-party extension which integrates tabs into the existing Windows Explorer app, most useful for Windows 10! In my experience, this app is best installed traditionally, as I've run into issues with Chocolatey in the past with this one.
Once installed, enable it by going to File Explorer and selecting the following if it's not enabled already:
View -> Options (The Down Arrow) -> QTTabBar
4.3 ~ Getting Activated
Once Microsoft Office is finished installing via Chocolatey, follow these instructions for activating both Windows and Microsoft Office via PowerShell here.
To verify...
- Windows Activation: Search
Activationfrom the start menu - Microsoft Office Activation: Open any of the apps (ex., Word, Excel, PowerPoint) and you should be able to start using it right away!
4.4 ~ Restart To Apply Updates
It's at this point where it's important to wait for updates to finish and restart your computer. You may need to restart multiple times to fully apply them, but only during the initial setup and very likely NEVER multiple times in a row after that!
Keep the following in mind:
- If some updates give an error message, it's because other updates need to be installed before they do.
- If updates get frozen or you lose patience, just restart, refresh and check again. Rinse & repeat until there are no more.
You'll know you're up-to-date when you see the green check mark in the settings. ✅
4.4.1 ~ Password Prompt
You may not have set a password during your initial setup. If that's the case, you'll be prompted to create one. You'll be prompted with three fields. Leave the top one blank as no password being set is equivalent to an empty string. Create a password in the second field, then repeat it in the third. From here, you can log in, check for updates and restart again if needed.
[Old Password] (Leave Blank!)
[New Password] (Enter new password!)
[Confirm Password]
4.5 ~ Debloat & Tweak (Highly Recommended)
Now that updates & everything we need are activated, we're ready to debloat and optimize our system even further than what is objectively the best baseline experience.
You can skip parts of this section or debloating entirely if you need to get to work on important projects fast, but it's recommended to continue with this part of the guide if you can.
4.5.1 ~ Restore Microsoft Store & Install Wintoys
Yes, you read that correctly, and yes, the Microsoft Store is actually not included in this version of Windows by default. We're going to restore the Microsoft Store manually, as there are still diamonds in that otherwise enshittified ecosystem. Alternatively, you follow this guide to install apps from the store WITHOUT the store!
One of these is Wintoys, described as follows:
"Unlock the full potential of the operating system and control every aspect of the experience in a safe and time-saving manner. You can configure, optimize, clean, repair, and tweak Windows to your preference, having all the settings you need at your fingertips."
To install the Microsoft Store, download this GitHub repository as a ZIP file and unzip it by double-clicking the folder and following the prompts provided by Windows Explorer.
Once unzipped, run Add-Store.cmd as Administrator via right-clicking. This should
restore the Microsoft Store upon completion, but if you run into issues, follow the instructions provided there.
Opening the Microsoft Store should work now, and you'll be prompted to update it. Please do so and relaunch if needed. Once it's loaded properly, search for Wintoys and download it, or use the link provided.
Once downloaded, you can explore Wintoys and optimize your system to your heart's content! There are many settings to look at & change, which I cover in my video at [this timestamp], way too much to cover in this written guide.
The most important setting to change is to disable Search Indexing, a process which
slows down your system to make Windows search run faster... except it's still way slower than third-party
alternatives like Everything and Ultrasearch, both of which I use often on Windows!
Go to Performance -> Search Indexing and switch that 💩 off!
Alternatively, if you want to avoid installing the Microsoft Store entirely (not recommended primarily because Wintoys is that good!), you can instead do the following:
- Search
Servicesin the search bar.- Scroll to the bottom of the list & locate the
Windows Searchservice.- Right-click, select
Properties, and change startup type toDisabled.
4.5.2 ~ WindowsPowerTool
This is a very simple interface which allows for additional debloating options, sourced from the windows-powertool/Powertool GitHub repository.
Run the following command to launch the interface:
iwr -useb tool.windowpowertool.workers.dev | iex
Simply go through the menus and change whichever settings you'd like. What's most critical here is to remove OneDrive! We do this after we install Office because it would re-install OneDrive otherwise!
4.5.3 ~ ChrisTitusTech's WinUtil
Described as "the ultimate Windows Utility" by Chris Titus Tech, this is a powerful tool that goes beyond debloating, providing a GUI-based way to batch-install plenty of programs at once, among various features you can explore all in one place!
Follow the instructions provided right from the source, or copy/paste the command below as Administrator:
irm christitus.com/win | iex
We focus on Tweaks for this guide. Simply apply the standard tweaks and run them. You can also
customize some preferences on the right side of the menu if you'd like! I usually switch the following:
- Enable
File Explorer Extensions - Enable
File Explorer Hidden Files - Enable
Num Lock on Startup - Disable
Sticky Keys
Once again, explore as you please, as you'll find many more incredibly useful features here!
5 ~ Carefully Restoring Files
Now that we've successfully debloated the majority of Windows, we are good to restore backups, but be careful! It
can be tempting to simply copy/paste the exact folder structure, but you can easily replace or misconfigure
something in the process. For example, sometimes restoring the entirety of my Windows.old folder
resulted in me not being able to download anything from the Microsoft Store, even if I chose Skip All
instead of Replace All.
My recommendation is to selectively restore what you need as you go. You can do some of the
major folders with your documents and saved files like Documents, Downloads, and
Desktop to start off with, then paste over more as needed.
If restoring from
Windows.old, the full file path isC:\Windows.old, right at the root. Within it, you'll findUsersand your username.
With that, you've successfully set up a pristine Windows experience! If you are not interested in dual-booting Linux, you're finished! Enjoy using your computer to its maximum potential at long last! 💹
6 ~ Preparing To Install Linux
Welcome to the beginning of the second part of this guide! Now that our Windows experience is fully set up, we're almost ready to install Linux!
6.1 ~ Creating a Partition Via Disk Management
Right-click on the start menu, then click Disk Management.
Once it loads, focus your attention on the bottom of the window. The bars below are visual representations of your storage. We'll essentially be splitting the bar containing your Windows install in two.
Aside: Here is my setup as of July 2026, with each ~230 GB partition being for Windows and Linux, respectively.

Right-click the `C:` drive bar and select Shrink Volume. Enter the amount of space to shrink in MB.
You can split this amount to your liking, according to your needs:
- If you primarily want to daily-drive Linux and only need Windows for a select few applications that don't take up a lot of space (Ex., just MS Office and small Windows-exclusive programs), you can enter the maximum amount possible.
- If you want to tinker with Linux without committing to a distro, set a smaller amount.
- If you balance your Windows & Linux usage, either split it down the middle or give the Linux partition a modest size.

It's up to you what size to give it, but it doesn't really matter for just testing things out (provided it's a reasonable minimum number of GB; I'd say enter 40000-50000 MB at minimum here). You can always re-install and reconfigure the amount of space you want to give your Linux install if you change your mind later. See the instructions described in 9.2 ~ Delete The Partition(s) Containing Linux Data to do this.
6.2 ~ Choosing A Linux Distro
Linux distros (short for "distributions") are essentially different variations, configurations or "flavours" of Linux tailored to specific types of users or use cases. There are many to choose from, each serving different needs (e.g., desktops, servers, power users, beginners). The links in this section will provide you with much more information about them!
The age-old yet modernly prevalent question of which distro to pick is now upon us! Here's how to decide which NOT to pick first, which makes things much easier!
Some distros are actually not dual-boot friendly on the same drive. So, for better or worse, our options whittle down significantly since this guide aims at supporting beginners.
For this guide, we define "dual-boot friendly" as follows:
"Dual-Boot Friendly" Definition
There must be a graphical or otherwise very straightforward process of selecting our partition and telling Linux to install to it. Anything more difficult than that (ex., "Advanced" or "Manual" partitioning) is considered too complex for beginners, even if it is possible!
For a complete list of Linux distributions to try out, view this Wikipedia Template.
6.2.1 ~ Confirmed Dual-Boot Friendly Distros
Fortunately, I was able to find dual-boot friendly distros for all three major distro families! Also, keep in mind that this is NOT an exhaustive list!
| Distro | Based on... |
|---|---|
| EndeavourOS | Arch |
| Manjaro | Arch |
| Debian | Debian |
| Hannah Montana Linux v26 👩🎤✨🎤 | Debian |
| Q4OS | Debian |
| Aurora | Fedora (RHEL) |
| Bazzite | Fedora (RHEL) |
| Fedora | Fedora (RHEL) |
| Nobara | Fedora (RHEL) |
| Ultramarine | Fedora (RHEL) |
| Linux Mint | Ubuntu |
| Lubuntu | Ubuntu |
| QuarkOS (DDashUnknown's Daily Driver! 💙) | Ubuntu |
| Ubuntu | Ubuntu |
| ZorinOS | Ubuntu |
RHEL = Red Hat Enterprise Linux
6.2.2 ~ Confirmed Non Dual-Boot Friendly Distros
Though the distros listed below are considered non dual-boot friendly on the same drive, it's not necessarily impossible to get working in all cases.
NOTE: I have intentionally not linked the distros in this list as they are not recommended for this guide!
| Distro | Based On... |
|---|---|
| Arch | Arch |
| CachyOS | Arch |
| Omarchy | Arch |
| Linux Mint DE | Debian |
| PikaOS | Debian |
| StillOS | Fedora (RHEL) |
| openSUSE | SUSE |
| ElementaryOS | Ubuntu |
And, in addition to this list, anything close to the difficulty of installing Arch (even if it's much simpler for installing to an entire drive) is assumed to be here as well. This table would go on for ages otherwise.
6.2.3 ~ Desktop Environments
In addition to distros, you also need to think about which desktop environment you want to use. These are most easily thought of as a user interface, or what you visually interact with.
Like distros, there are many to choose from. Some distros even offer multiple different environments, allowing you to mix-and-match however you'd like! Suppose you end up not liking a distro because of its desktop environment. You may end up loving the same or similar distro with a different desktop environment instead!
Desktop environments should be thought of separately such that they complement one another.
We'll keep things simple & recommend you go with one of the following:
- KDE Plasma
(DDashUnknown's Choice! ✅)
- Provides a CUSTOMIZABLE Windows-like Experience
- Packs a TON of useful applications and utilities out of the box!
- Excellent for power users, but the defaults are very welcoming to beginners too!
- GNOME
- Provides a Mac-like Experience
- Simple out of the box
- Requires extensions for enhanced functionality
- Cinnamon
- Provides a SIMPLIFIED Windows-like experience
- The most welcoming for beginners, and best for those who wish not to get overwhelmed with options.
- The default of Linux Mint
For more information about desktop environments, check out this complete comparison chart. It may be a lot to look at initially, but it's super comprehensive!
7 ~ Installing Linux
Once you've done your research, looked at your own needs, wants, and workflows, we hope by this point you've found your distro & desktop environment of choice to install! Whether you're confident that this will be your main OS long-term, or you're still figuring things out, it's all okay! You can reverse this process in Section 8 & install a new one at any point.
With that, you're ready to install Linux alongside Windows on the same drive, at long last!
7.1 ~ Flashing Your USB & Rebooting
Download your ISO of choice. Then, either using Rufus or Balena Etcher, flash your ISO to a USB drive just as you did with Windows earlier!
If using Balena Etcher, just flash your USB using the interface below:

Also, as earlier, reboot into either your BIOS/UEFI or Boot Menu as before and select your USB drive.
NOTE: If you place it at the top of the boot order list, you may need to manually switch it back unless you unplug it, so booting into it a single time from the Boot menu is more ideal.
7.2 ~ The Live Environment & Partitioning
Your distro should boot you into what is called a live environment. It's best thought of as a "playground" where you can test out the desktop environment, install a few smaller apps and explore how your version of Linux works without making any permanent changes to your system.
Once you're satisfied playing around (or want to go straight to installing), follow the on-screen instructions for installing your distro to your liking, installing proprietary codes (always do so if presented the option to!) and connecting to Wi-Fi if required or beneficial. Eventually, you'll get to the partitioning screen, which will look like one of the following:
[Most KDE Distros Here]
[Fedora / Ultramarine Linux Here]
Here, you will select the vacant space in one of two ways:
- You will select the gray, unallocated space visually.
- You will select the option to claim all unallocated space.
This is why we created a separate partition with unallocated space earlier, as some distros don't allow you to create one on-the-fly in Linux right at install time, such as Fedora or Ultramarine Linux. It's best practice to do it on the Windows side as such.
⚠ WARNING: THIS IS A CRITICAL STEP TO GET RIGHT! BE SURE TO SELECT THE CORRECT OPTION AND NOT WIPE YOUR ENTIRE SYSTEM BY ACCIDENT! ⚠
You can also encrypt your drive with an additional separate password from your login password if you wish, which you'll enter before booting into Linux.
7.3 ~ Rebooting Into the Bootloader
Once you're satisfied with your settings, you're ready to install! Once the process is complete, you will likely be prompted to restart. Some distros also prompt you to remove your USB drive before continuing, which you should do. Otherwise, it's not harmful to keep it in for a little longer. Worst-case scenario, you can shut down your computer, remove the USB drive & manually turn it back on, booting into the BIOS/UEFI settings or Boot Menu if need be.
If all goes well, you should boot into what is called a bootloader, a small but vital menu which allows you to select which operating system you want to boot into at startup. Most distros use GRUB, so we move forward on this assumption, but the process is relatively similar for other ones, too. By default, if you do nothing, you will boot into Linux automatically. You only have a few seconds to change your option via the arrow keys! We can disable this in section 7.4.2 ~ Disabling Timeout at the Bootloader (Optional) if you wish.
Windows & your BIOS/UEFI settings should be listed as options right alongside your Linux distro, confirming you've done this correctly!
7.4 ~ First-Time Booting Into the Linux Desktop
Most distros provide a welcome screen with instructions on what to do for a first-time boot. The most critical of these to do are the following:
- Installing proprietary codecs (if not already done at install time)
- Installing NVIDIA drivers (for NVIDIA graphics cards)
For distros that do not prompt you to install the base NVIDIA drivers, nor provide an NVIDIA-ready ISO, I can offer the following one-line commands you can run in a terminal for Ubuntu-based and Fedora-based distros, respectively.
Search for terminal and open your distro's provided terminal, then run one of the following commands
below:
For Ubuntu-based distros (sourced from this article):
sudo ubuntu-drivers autoinstall && sudo ubuntu-drivers install
# One of the above commands should work.
For Fedora-based distros (sourced from the Ultramarine Linux Wiki):
sudo dnf update -y && sudo dnf install akmod-nvidia -y
# `akmod-nvidia` installs the NVIDIA kernel module.
For Debian-Based Distros:
The process is a little more involved for installing NVIDIA drivers on Debian-based distros. Here are the options I recommend:
- Watch this video for a step-by-step guide to install
nvidia-opendrivers on any Debian-based distro.- Choose Q4OS for your distro (based on Debian), which provides the most user-friendly way to install NVIDIA drivers right at your first boot after installing. It will prompt you to do so and actually prevent you from continuing until you do, so you're guaranteed to not miss it!
For Arch-Based Distros:
This guide aims for beginners. Since Arch-based distros are not super beginner-friendly in general, refer to the official Arch Wiki page for further instructions.
Continue the recommended steps provided by your distro and make the choices you'd like to. I would also recommend changing the following if needed:
- Display configuration (to change your screen resolution and refresh rate if needed)
- Auto login (only suggested if you have your drive encrypted to save some time while still having a password)
7.4.1 ~ Updating Your System!
On a first-time boot, it is very critical to update your system. You can do this through your software manager's GUI (if you have one), or you can open a terminal and run the command for your distro.
NOTE: The
-yflag skips all confirmation prompts & is generally faster. If you're running more sensitive operations like installing and uninstalling, consider removing it if you're unsure!
For Debian-Based & Ubuntu-Based Systems:
sudo apt update && sudo apt upgrade -y
Aside: Instead of the above, consider using
nalainstead ofaptfor a much more visually pleasing experience! Simply replaceaptwithnalaafter installing.sudo apt update && sudo apt install nala -y && sudo nala upgrade -y
For Fedora/RHEL-Based Distros:
sudo dnf update -y
We assume you know what you're doing here if you're using anything outside of Debian, Ubuntu or Fedora, as package managers outside of these are more fragmented in my opinion.
From here, you can view other resources for your specific distro of choice and set up your system as you'd like!
7.4.2 ~ Disabling Timeout at the Bootloader (Optional)
Since this is a dual-boot guide, it's likely that you'll need to boot into Windows quite often, and it can be quite annoying if you don't press anything within those few seconds & switch to it manually every single time. It's also annoying to put Windows at the top of the boot order, as you'd THEN need to manually put Linux back on top just to boot into it at all!
That's why I recommend disabling the timeout. As before, most distros use a bootloader called GRUB, so the instructions in this guide will apply to most users. If not, you can look up the equivalent for your own.
- Open the terminal and run:
sudo nano /etc/default/grub
This will open a text file in your terminal, which you'll use arrow keys to navigate instead of your mouse.
nano is my preferred editor of choice here, but you can use your own if you'd like by replacing
nano as needed.
- Navigate with the arrow keys to the
GRUB_TIMEOUTline, and change the variable from whatever number it is to-1, which will disable the timeout in the bootloader entirely. - Run
CTRL + Sto save the file, thenCTRL + Xto exit. - Run the following command to apply the new file:
sudo update-grub
Now, you can choose whichever OS you wish to boot into manually every single time with no issue!
From here, paths diverge significantly based on what you want to get out of your system. This is a broad guide for setting up many distros in their default state, so from here (if you're satisfied) the world is your oyster in terms of your computer experience!
NOTE: Your boot order will place your Linux install at the top of the list in both your bootloader and in your BIOS/UEFI settings every time. You can also search up how to do this yourself if you'd like.
Welcome to the world of Linux. :)
8 ~ A Time Change Issue & Easy Fix
When dual-booting, there is an annoying quirk where the time zone changes when booting back into Windows, which can be fixed with a simple registry tweak.
Simply type in reg in the search bar, and Registry Editor should appear. Accept the
Administrator prompt to open the editor.
Copy the following registry key path and paste it into the top bar (way faster than navigating manually, which is oddly way more common in tutorials).
HKEY_LOCAL_MACHINE\SYSTEM\CurrentControlSet\Control\TimeZoneInformation
Right-click in an empty area on the window & create a new DWORD value. Its name should be:
RealTimeIsUniversal.
Then, right-click the newly created DWORD and click Modify. Set its value to 1.
This should fix the time issue permanently. Now, either sync the time in Windows settings manually or reboot, and the time should be adjusted accordingly, never randomly changing again!
9 ~ Completely Removing Linux
If, for whatever reason, you're unhappy with your current Linux experience and wish to either reinstall your current distro fresh, install a different one, or give all your storage space back to Windows, this section of the guide covers you start-to-finish!
There are surprisingly very few popular tutorials on how to properly uninstall Linux from your system entirely. It's a multi-phase process, but it is quite manageable once you understand each part of it separately.
First and foremost, you'll want to reboot back into Windows if you haven't done so already.
IMPORTANT!
Remember that this is a Windows-first, Linux-second approach in terms of installation order, so it's Windows we always want to keep!
Let's begin!
9.1 ~ Removing Boot Entries
In this section, we're going to completely remove the ability to boot into our current Linux distro. We do this because deleting the data on the partition is not enough and would likely result in you booting into a blank terminal screen. It's wise to do this first since it's otherwise tempting to just delete the data on the partition and move on. Repeating that process in your distro-hopping journey will leave you with a mess of boot entries. Thus, we'll get that out of the way first.
We have the following instructions, sourced from this video:
- Run CMD or PowerShell as Administrator
- Run the
diskpartcommand in the terminal. This utility will allow us to access our boot entries. - Run
list diskto see which disk to select. - Run
sel disk Xto select diskX(whereXis a number), the drive we installed Windows 10 on. In most cases, it should be0or1. - Run
list partto list all the partitions on the disk. You'll see that the first one is labelled asSystem. This is the partition that contains the boot entries. - Run
sel part Yto select the correspondingSystempartitionY(whereYis a number). In most cases,Yshould be1. - Run
assign letter=N. This gives PartitionYa drive letter, allowing us to easily navigate to it in the terminal. - Run
exitto quitdiskpart. - Run
cd N:\efito enter the newly created `N:` drive, specifically in theefifolder where our boot entries are contained. - Run
lsordirto list all the boot folders on your system. The names of these folders correspond to all the operating systems you have ever installed without deleting their boot entries, irrespective of whether you deleted the data on the partitions! - Deleted unwanted folders using
rmdir. DO NOT DELETEBoot,MicrosoftOR ANY FOLDERS YOU DO NOT RECOGNIZE! For example, if you installedFedora, runrmdir Fedorato completely remove its boot entry. Keep in mind that sometimes the name will be of the distro family instead of the distro itself, so delete with care! - Run
lsordiragain to confirm that the folders are gone. If so, you've deleted the boot entry! - Enter the cleanup commands below one-by-one to unmount the newly created
N:drive:
diskpart
sel disk X
sel part Y
remove letter=N
exit
You have now successfully deleted all boot entries! ✅
9.2 ~ Delete The Partition(s) Containing Linux Data
Go to Disk Management as you did before to create the partition. Locate the non-Windows partitions
to the right of the `C:` drive. Usually there will be one or two per Linux install, but there could be additional
recovery partitions if you've used your system for a while without a clean reinstall.
Right-click the partition(s) containing your Linux install and delete them. Then, click on the `C:` drive partition
and select Extend Volume. By default, the maximum amount to restore will be selected, which you can
adjust as needed.
TROUBLESHOOTING TIP! 💡
If there are recovery partitions preventing you from extending your `C:` drive, follow the instructions in this video to fix the problem!
10 ~ COMPLETION!
You have now completed the ultimate dual-boot guide for safely installing both Windows and Linux on the same drive! 🥳
With this knowledge, your experience using your computer is now at its maximum potential! Whether you...
- want to tinker with Linux for the first time safely...
- primarily want to use Linux but still need Windows for a few select applications...
- are preparing to ditch Windows entirely...
I hope this guide was beneficial for you! I designed it such that at least some sections should provide incredible value for most people. If that's how you feel, I effectively did what I set out to do.
Thank you! 💙
If you wish to further support me, check out all my links here!
Take care, much love, much Linux 🐧 & peace out! ✌